Friday, September 8, 2017

Transforming Transformer DIY CostumeTutorial

Each year I strategically plan suggestions for my son's Halloween costume and try to get him to voluntarily change his idea of being Luke Skywalker for Halloween to something that is more fun for me to make.  When I showed him some pins of Transformers "that really transform," he was sold.
Here's the final product:
Here's a video of the transformation.

I used a few things for a couple tutorials I found on Pintrest, but there was a lot of just trying to figure it out.  As such there is definitely room for improvement in my method, but here is a tutorial of how I put our little transformer together:

Materials:
- 2 large boxes of different sizes (hint, sit them toghether to make sure they're the size and shape you want before you start cutting)
-various other boxes and pieces of cardboard
-5 large white paper plates
-5 small white paper plates
-4 empty toilet paper tolls
-4 empty paper towel rolls
-fun battery operated lights (I used 2 silver pumpkin lights from CVS and an under cabinet light strip from Walmart)
-duct tape
-spray paint - silver, red, blue, orange, yellow, black (we used tempera paint for the black)
-7 strips of elastic (exact lengths vary)
-4 nuts
-cardstock
-painters tape
-5 sheets silver adhesive vinyl (bonus if you have a vinyl cutting machine like Silhouette or Cricut)
-Hot glue gun and lots of hot glue sticks to go along with it


I started with a box that would serve as the "hood" of the truck.  I cut out a section towards the back so that it would sit on his shoulders and so his back could be under it when he laid down to transform. Had my kiddo test it out for size.

 
Then I cut a little door that his head could poke through when he was in robot mode. 


We lined all of the edges with duct tape. We did this to reinforce the areas, to make the door for his head open and close more smoothly, and to make it more comfortable.  
  
  
 Next we did the "cab" of the truck with a taller box.  We just cut a space out of the front and back to allow his body to lay under it.  Not pictured: we added a piece of cardboard across the bottom, since this would be covering his belly when he's standing. (You can see this later).

 
Next I cut pieces of a box to make the grill.  I made it about the length of the front of the truck, but with tabs on the ends for the headlights. Then I did accordion folding to give it texture. I covered it in duct tape. (I might have been able to skip this step and just spray paint it, but this is what I did.)

 
To make the wheels we took some plain white paper plates - 2 large and 2 small.  My son painted the plates black with tempera paint - the wheels were his primary contribution

 
For the "rims" I used more paper plates - 2 small and 2 large, and cut a spoke shape out of the bottom part of the plate so it would fit within the rim of the "tire" plates.  Then I spray painted them and the grill silver (so yeah, probably didn't need to duct tape the grill). I hot glued the rims inside the tires as shown.


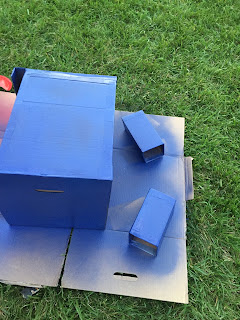
For the legs I made two rectangle pieces out of boxes. (I used my kid to size these, but forgot to take a picture before I painted them.)  Then I spray painted the cab and the legs blue.


For the wheels, I made these out of white paper plates - 1 large plate cut in half and cut part of the center out, and 1 small plate just cut in half. Then I spray painted them red. Also not shown I cut 2 squares from boxes to use for the front wheels/hands (pictured later) and spray painted them red as well.


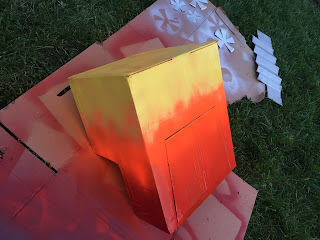
I spray painted the hood entirely red.  Then I got some orange spray paint and painted about 2/3 of the front part on top of the red. 


Then I spray painted the front 1/3 of the hood with yellow.

I cut some flame shapes out of cardstock to use as a stencil and taped it around the bottom of the legs.   


 Then I spray painted red.

 
 Next I used the same flame carstic stencils and taped them to the hood.  I taped them a little less than half way with the carstock flames pointing towards the front so that I could spray paint the front part blue.

 I hot glued the larger wheel covers to the cardboard squares for the front tires.

 On the legs, I hot glued the small wheels and wheel covers as shown so that a wheel would be on the outside of each leg.

I hot glued the grill to the front of the hood.
 
 I purchased these battery operated lights from CVS.  They had a button on the front to turn them off and on.  I hot glued them to the tabs on the outside of the grill to serve as headlights.

  
To get the costume on, I used elastic. I think there's probably a better way to do this because the elastic made the costume bounce when he moved, but it worked overall.  I measured it out with my kid to get the right fit and cut two pieces.  


Then I had to put the straps on the cab so he could wear it around his hips. Getting the straps secure took some trial and error. I learned that hot glue didn't hold up enough. We ended up using a screen and scissors to make a hole through the duct tape enforced areas where we wanted to attach the elastic, then put a nut on the elastic and tied a knot on the end, this kept it from being pulled out of the hole.  Did this for all four connection points.

T 
 Adjusted for size on the kiddo. Attached to the cab like suspenders. (this pic is when I was trying to use hot glue, before we threaded the elastic through the box. Criss-crossed in the back (this pic is when I was trying to use hot glue, before we threaded the elastic through the box)

 I found that the hood didn't stay quite right, so I had to hot glue a piece of elastic to keep it in the right place on his body.  It is glued high enough so he can lay under it and placed so he can get his head through the door, but without the box falling down around his shoulders when he did so. Basically this piece of elastic hung around the back of his neck when his head went through the door in standing mode.
 
 I glued some strips of elastic to the back of the front wheel squares. He put his arms in these and held onto them.

 Robot mode.

 
Now to get fancy. I had this under cabinet battery operated light I had purchased a while back from Walmart.


I cut some circles out of painters tape, using a toilet paper roll as a stencil.  Then I placed them over the little light circles on the light strip.


 I took 4 paper towel rolls - taping 2 sets of 2 together, and 4 toilet paper rolls and spray painted those and the under cabinet light (with painters tape circles) silver. I alsu cut a rectangular strip of cardboard and spray painted that silver to serve as a sort of visor over the top of the cab.


 Then I did a LOT of hot gluing.  I hot glued the visor to the top of the cab, over hanging the front a bit. And I hot glued the under cabinet light to the top, with lights facing forwards. I used lots of hot glue, gluing in the creases to make sure this was sturdy.  


I glued the long papertowel rolls to the dies and the toilet paper rolls as shown. To make the windows I had some silver adhesive vinyl and I just cut out some rectangles with scissors - two for the sides and two for the front.


I used my SIlhouette Cameo to cut a Transformer shape out of silver adhesive vinyl to put on the front/bottom of the cab - the part that is on the stomach in robot mode.

And there you have it!


Wednesday, October 19, 2016

I'm From Kansas City... Suburban Kansas City... and I'm... Okay With That

I have something to admit.  I am from Kansas City.  Worse.  I'm from the SUBURBS of Kansas City. When I was moved here against my will at the age of eight, I refused to assimilate.  I was from Oklahoma.  I kept that mentality for a long time, even when my Kansas residency well exceeded my time in Oklahoma.


After college I wasn't sure where I wanted to go, but I knew one thing.  I didn't want to stay in Kansas City.  I didn't really have anything against it, but the city was a dead city at the time, with nothing to entice anyone downtown on the weekend and I wanted to live IN a city, with life and adventure. A suburb is a suburb is a suburb and I was NOT going to spend the rest of my life in a suburb (see denial). So I found myself in Chicago and I fell in love.  I loved that city. I loved the feeling of life.  I loved that just walking down the street I felt like I was a part of something.  I loved the feeling of community where everyone was proud to be a Chicagoan.  It is something that I never felt in suburban Kansas City.  We had a great feeling of community in our neighborhood, with neighborhood parties, kickball in the street, and all that. We had a great community among our high school area (Once a Viking, Always a Viking). But I never felt a part of Kansas City.  Maybe because I'm suburban, or maybe because Kansas City was really as uncool at that time as I thought it was.


But something happened when I was away from Kansas City.  Any time people asked me where I was from I found myself defending Kansas City.  I had a lot of geographically confused people (one told me Kansas was in the South), a lot of Wizard of Oz jokes, a lot of people that assumed I grew up on a farm, and at least one person who was surprised to learn that people actually live in Kansas City (you know we support and NFL team and an MLB team, right?).  I found myself proudly carrying my Royals umbrella at a time when we were consistently the worst team in baseball.  I was standing up for KC... I think... maybe... I was proud of my KC roots. 


Years later when I faced the reality of moving back to Kansas City due to my husband's job, I had mixed feelings. It would be nice to be by my friends and family, but was I really going to live in suburban Kansas City by choice?  Well yes. You know what? Kansas City has great people, and that starts to matter more as I spend more time raising kids and working and less time adventuring. In addition, it had increased substantially on the cool charts (clearly trying to win me back) - I still haven't checked it all out so there's still room for plenty of adventure. So, it didn't take me long to admit it. I love KC.


Then 2014 happened.  The Royals. This is the team who had felt like a losing minor league team for so long. You guys, the Royals were in the playoffs!  And then, can you believe it, this Wild Card team went to the WORLD SERIES!!! It was so much fun to join together with our community during that time to cheer for the Royals, watch the games, and be part of the excitement. I traveled a little during that time and when I told people I was from Kansas City, I didn't get Wizard of Oz jokes or consoling comments.  I was being cheered on. Everyone knew Kansas City, everyone wanted to see the Royals win. Everyone asked me about Kansas City. And I was undeniably proud.  Then 2015 happened and the Royals WON the WORLD SERIES!  And then they CANCELED SCHOOL! They CANCELED SCHOOL for a PARADE! Wow. So we took off work, fought the crowds, and took the kids to the parade (well except the one-year-old who we sent to daycare... I know she's going to be upset about this some day). It was crazy, but it was amazing. Not only was my love for this city renewed, but my kids felt it. Everyone in KC felt it. People outside KC felt it. It was pretty amazing. There is no doubt now that there is definitely a feeling of community among the Kansas City metro area.


This year the Royals aren't in the playoffs (Cubs are though, go Cubs!). The I heart KC frenzy has died down a little, but the effects of 2014 and 2015 might last forever in our hearts. There is definitely a renewed love for all things KC. At the end of the day the people here are what makes it so amazing. The people here always have been the best, even out here in the suburbs. Those Royals were such a great representation of us; they won games, not by having some super star, but by each guy doing his part, playing good baseball, working together... and having fun. They were Kansas City. I love the Royals. I love our city.  Even if I'm in the suburbs. (But Chicago still has part of my heart - go Cubs!)


Tuesday, November 24, 2015

CamelCamelCamel - Amazon Price Tracking

I love Amazon but there is a certain need for skepticism and diligence in attending to Amazon pricing. Have you noticed how the price of an item on Amazon.com can fluctuate, not only day-to-day, but even throughout the day? Ever see a price on Amazon advertised as a "sale" or Lightning Deal only to realize Amazon's sale price is the same as other retailers own regular price? I actually saw a Lightning Deal today that was about fifty cents MORE than Amazon's regular price before the "deal." So how do you make sure you're getting a good price? Well first and foremost, Google the item before you buy so you can make sure it isn't cheaper elsewhere. Don't trust Amazon's "sale" prices. But say Amazon's price is as good as any or you're just trying to catch the best deal - how do you know when to buy when the price fluctuates so often?  CamelCamelCamel to the rescue!

http://camelcamelcamel.com/ is an Amazon tracking website.  It gives you a price history of the item and can also alert you when the price drops below a price point that you have specified.  Here's how it works:

You copy and paste the url of your Amazon item into the designated space on CamelCamelCamel.

Copy from here:
 
 
Paste to here:

The miraculous result?  A price history of your item with fantastic detail and optional alerts you can set for the item. (P.S., don't tell my daughter what she's getting for Christmas)


This graph shows the price history and can help guide you in deciding if you should buy now.  (I'm feeling bad for any suckers who paid $76.82 in March.) 


Then for even further detail, the table below highlights the highest, lowest, and average prices as well as indicating the last 5 pricing changes.  So while the current price isn't the lowest price, it's a pretty good one.  Incidentally compared to Target and Walmart, it's a great one.  So I can purchase at this price point feeling confident that I got a good deal.

If you really want a better deal than the current price, you can set up alerts. Enter your desired price and you will receive an email whenever the price drops to or below your desired price.


And there you have a brief overview of CamelCamelCamel.  Online shopping just got smarter.